LINE Official Account Connection Guide
If you already have a LINE Official Account, the connection itself takes only about 15 minutes. If you need to create a new account, allow up to 1 week including account setup.
Requirements
To connect your LINE Official Account, please prepare the following items first.
- LINE Business ID account — a dedicated login for LINE business. A clinic-domain email is recommended.Sign up for LINE Business ID →
- LINE Official Account (OA) created — the clinic channel that patients add as a friend.Create an Official Account →
- OA response settings configured — Chat OFF / Webhook ON / Auto-response OFF. The #1 cause of connection failure — must be set in advance.Response settings guide →
- Messaging API Channel created — the API credentials container in the Developers Console. Links to the OA automatically under the same Business ID.Create a Messaging API Channel →
- A channel that exposes the add-friend link — website, business cards, in-clinic QR, and so on. For testing, adding the friend from your own LINE is enough.
Helpful guides
These guides walk through the account setup needed for the LINE connection, step by step. If this is your first time, read them in order from the top.
Sign up for LINE Business ID
Create a business login account. A resilient owner identity across operator changes.
Read →Create Official Account + response settings
Create the OA, Chat OFF/Webhook ON (the core of the connection), Verified.
Read →Create a Messaging API Channel
Create Provider + Channel, links to the OA automatically.
Read →Connection steps
Unlike other channels, LINE has no OAuth delegation flow, so you connect by copying two values from the LINE Developers console and entering them into the CRM. There are 5 steps: prepare the account → copy the credentials → connect in the CRM → register the Webhook → test, and if the account is ready it takes about 15 minutes.
Prepare the LINE Official Account + Messaging API Channel
Time: New account: 1 day–1 weekIf you already have a LINE Official Account (OA) and a Messaging API Channel, skip this step and go to Step 2. If this is your first time, follow the guides below in order.
- Sign up for LINE Business IDSign up for LINE Business ID →
- Create Official Account + response settings (Chat OFF / Webhook ON / Auto-response OFF)Create an Official Account →
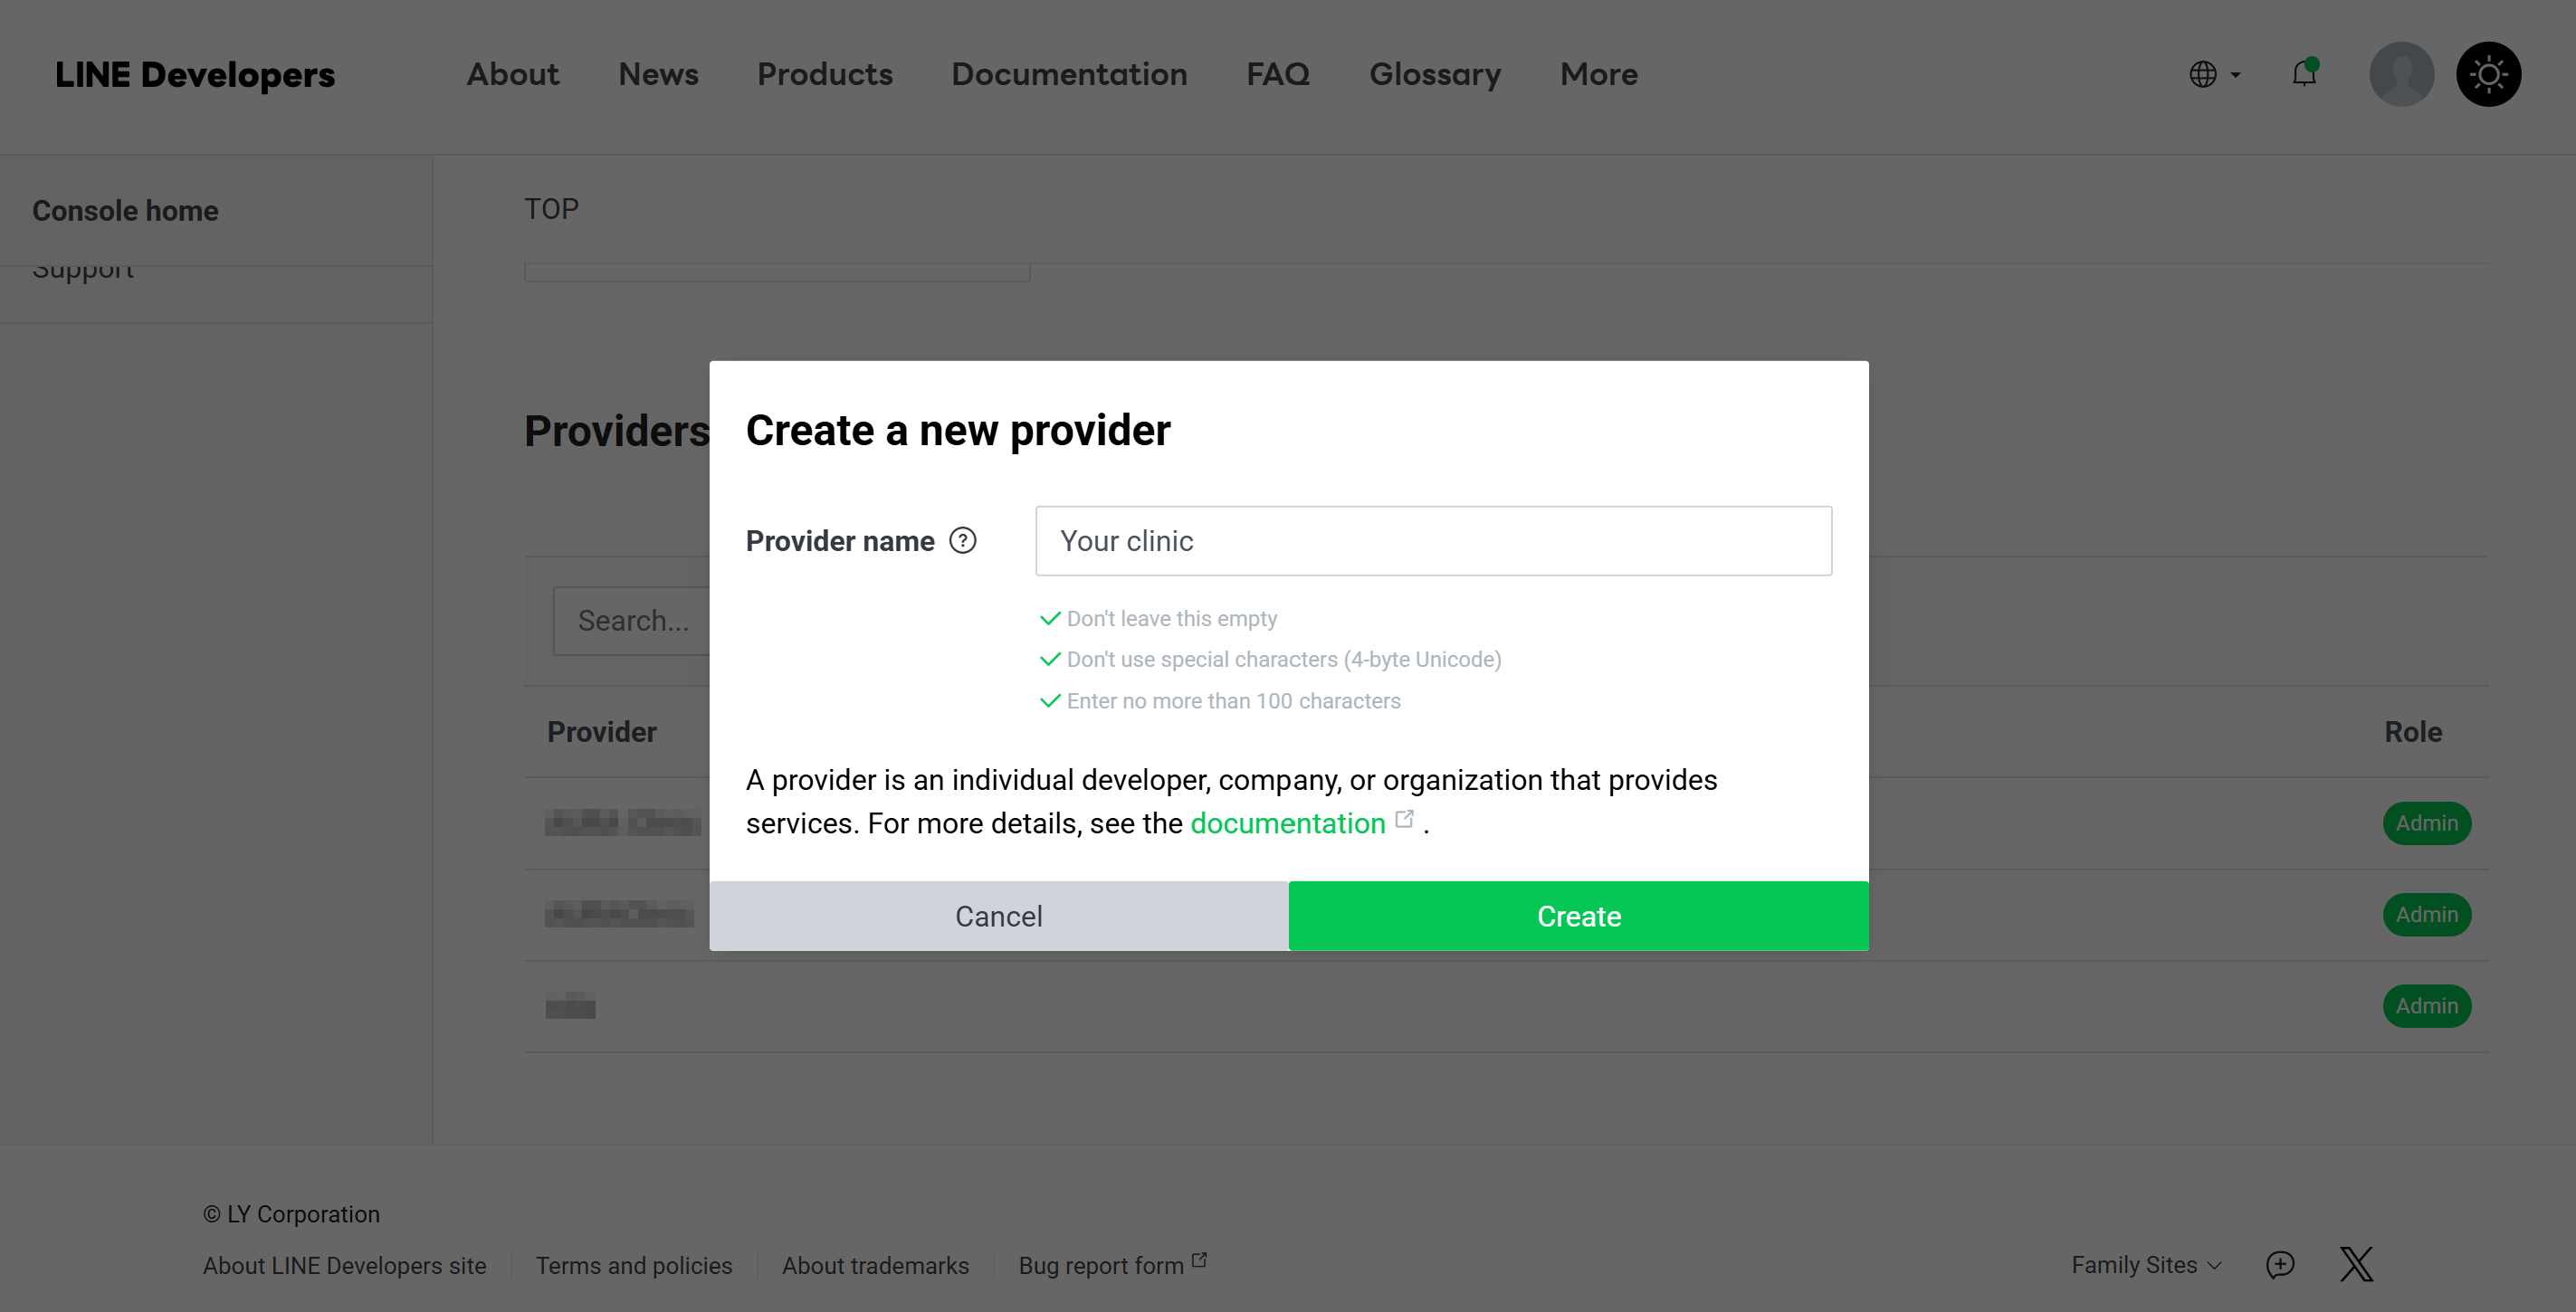
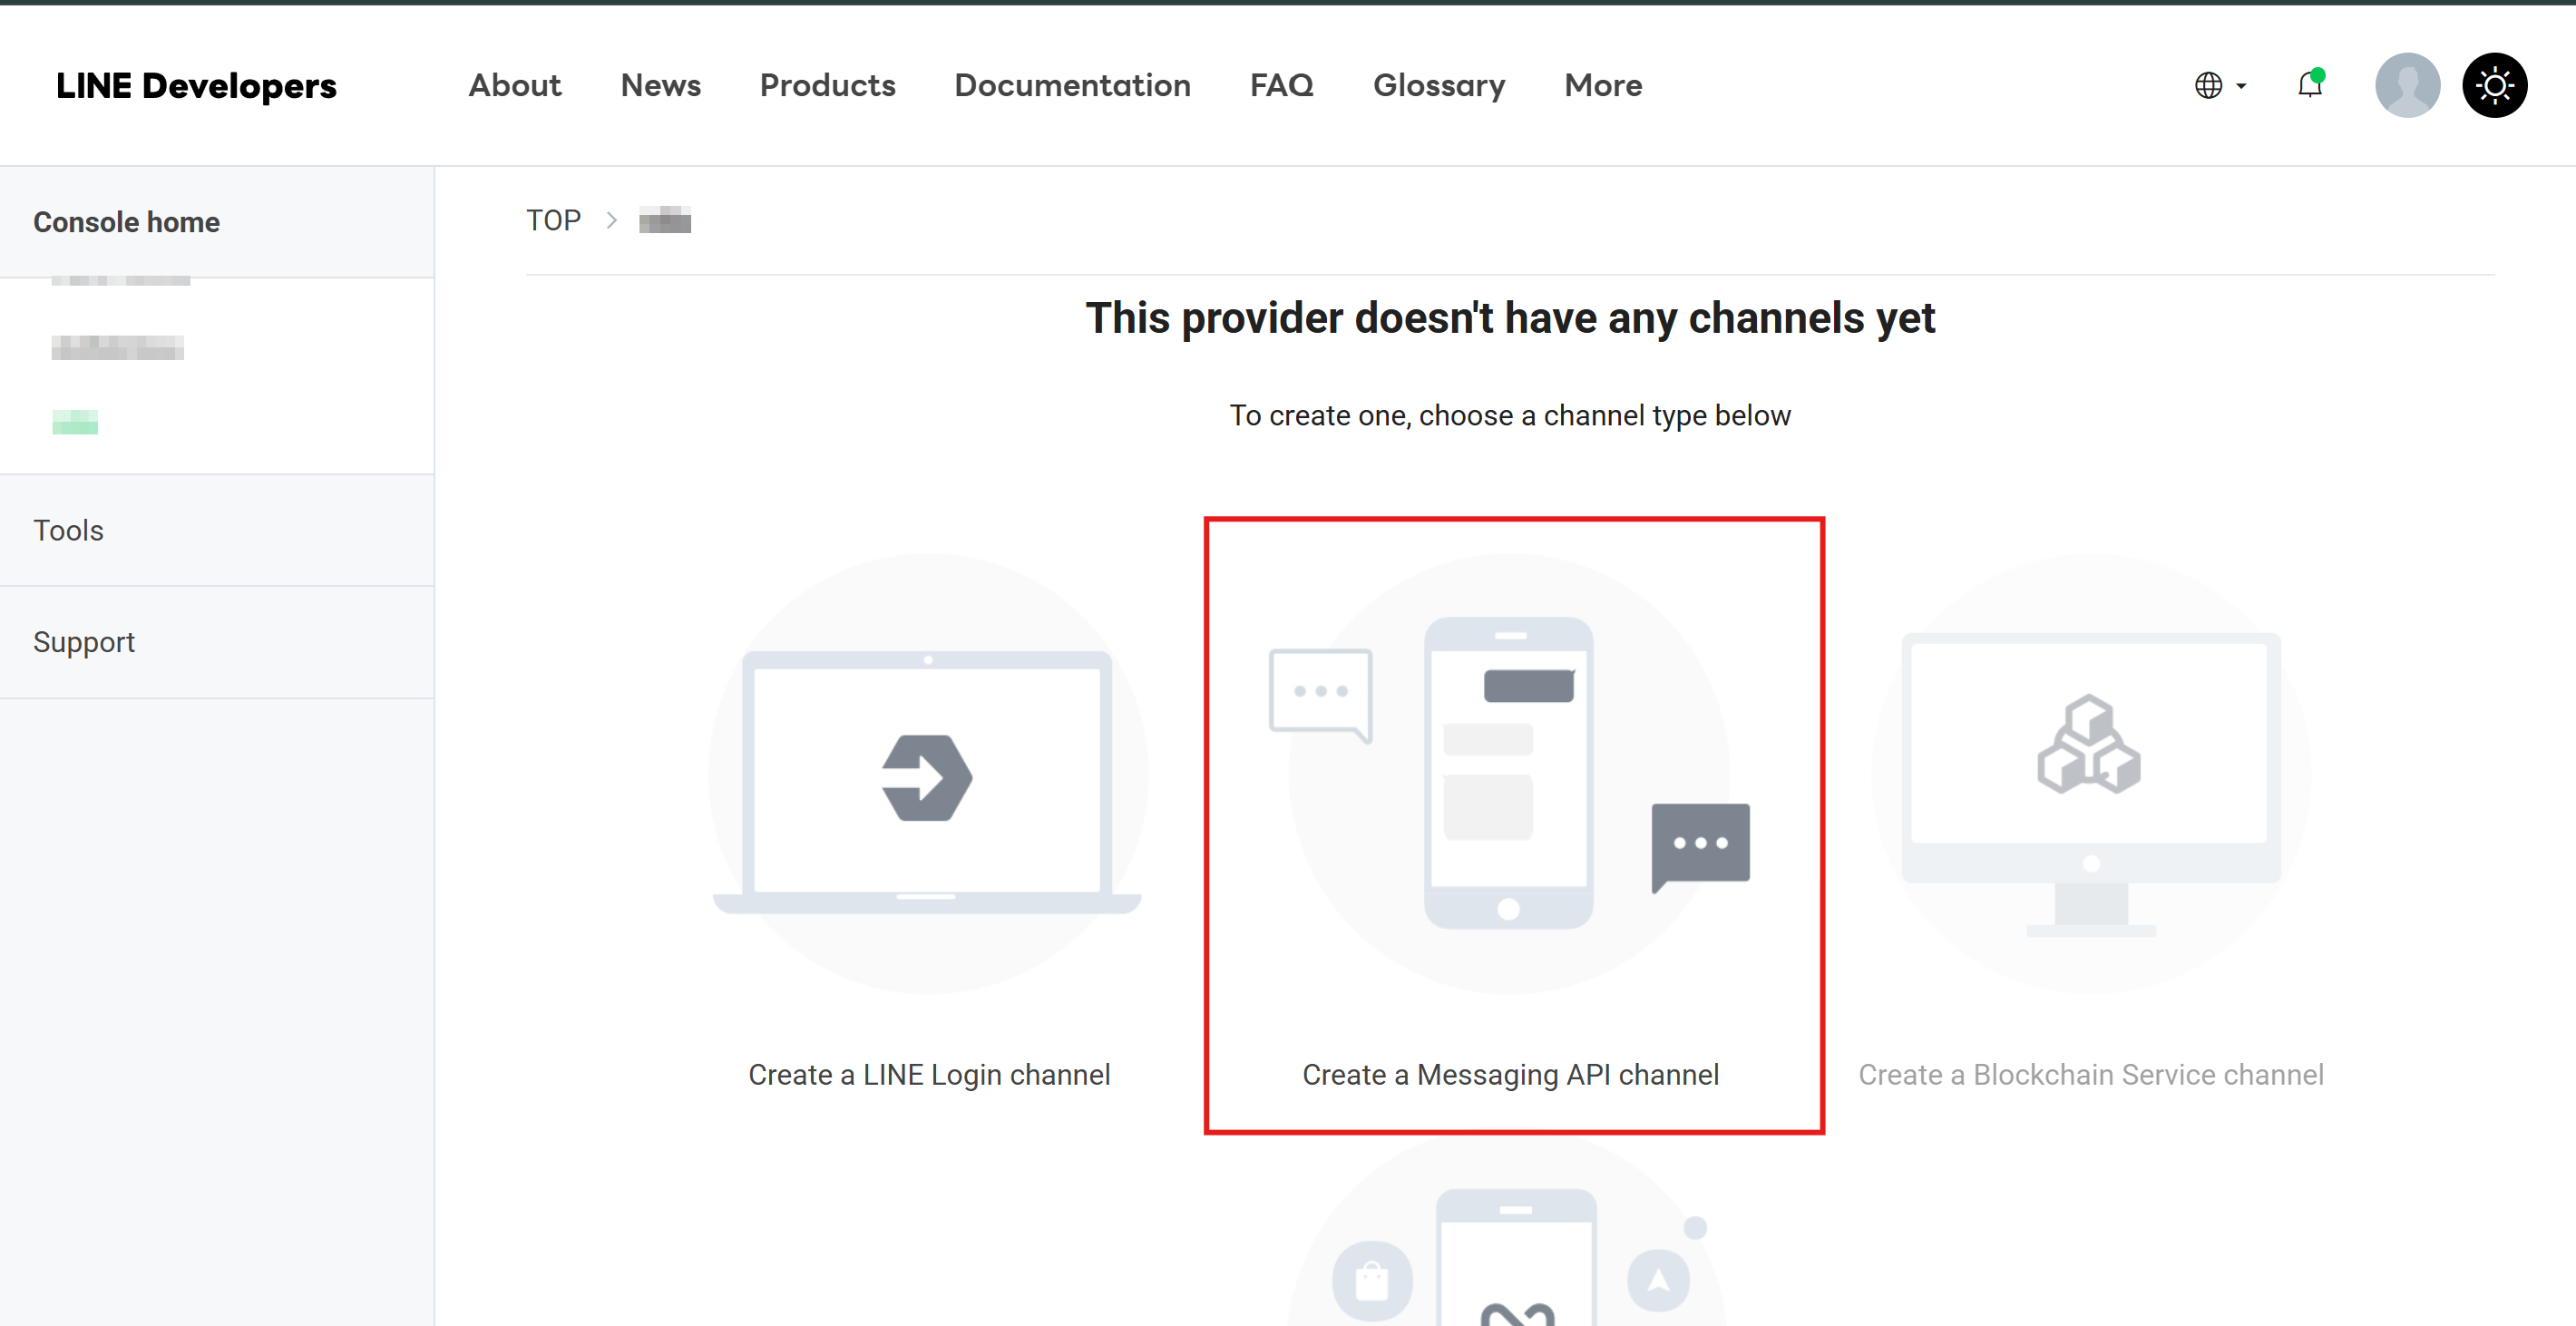
- Create a Messaging API ChannelCreate a Messaging API Channel →
Copy the Channel Access Token (long-lived) + Channel Secret
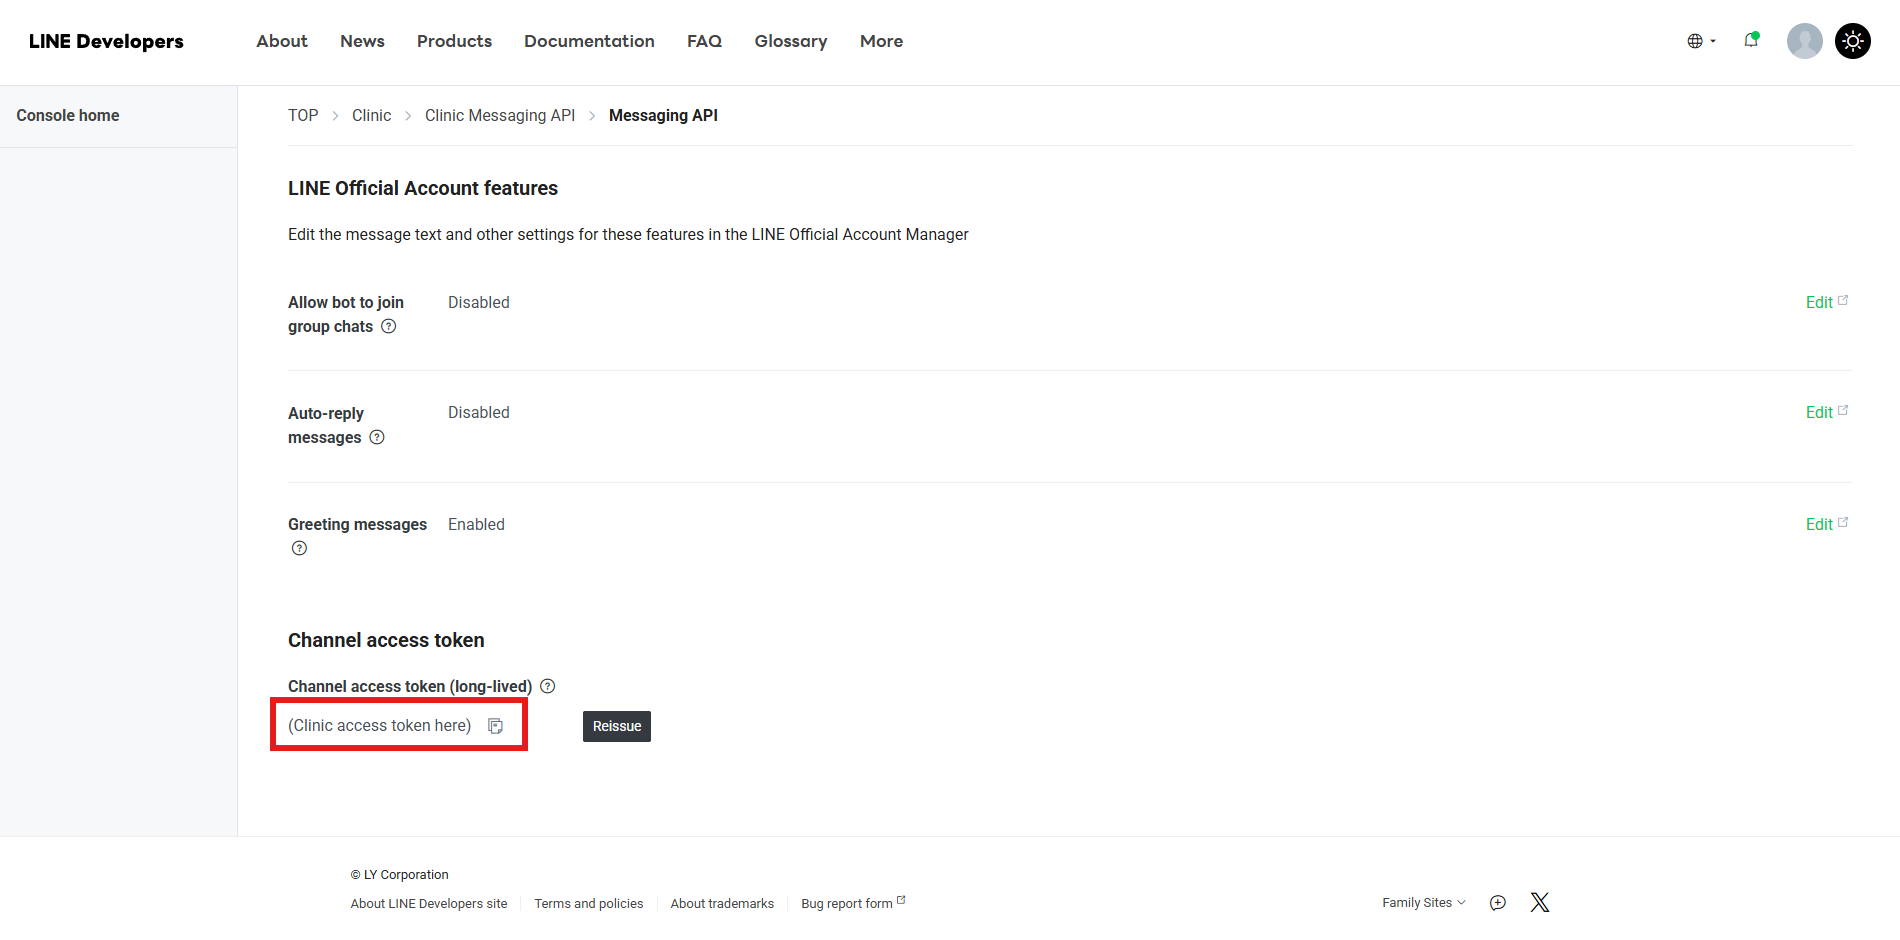
Time: 5 minutesChannel Access Token (Long-lived)
- developers.line.biz/console → select your Channel
- Messaging API tab
- In the Channel access token (long-lived) section at the bottom — click Issue to generate it → copy immediately
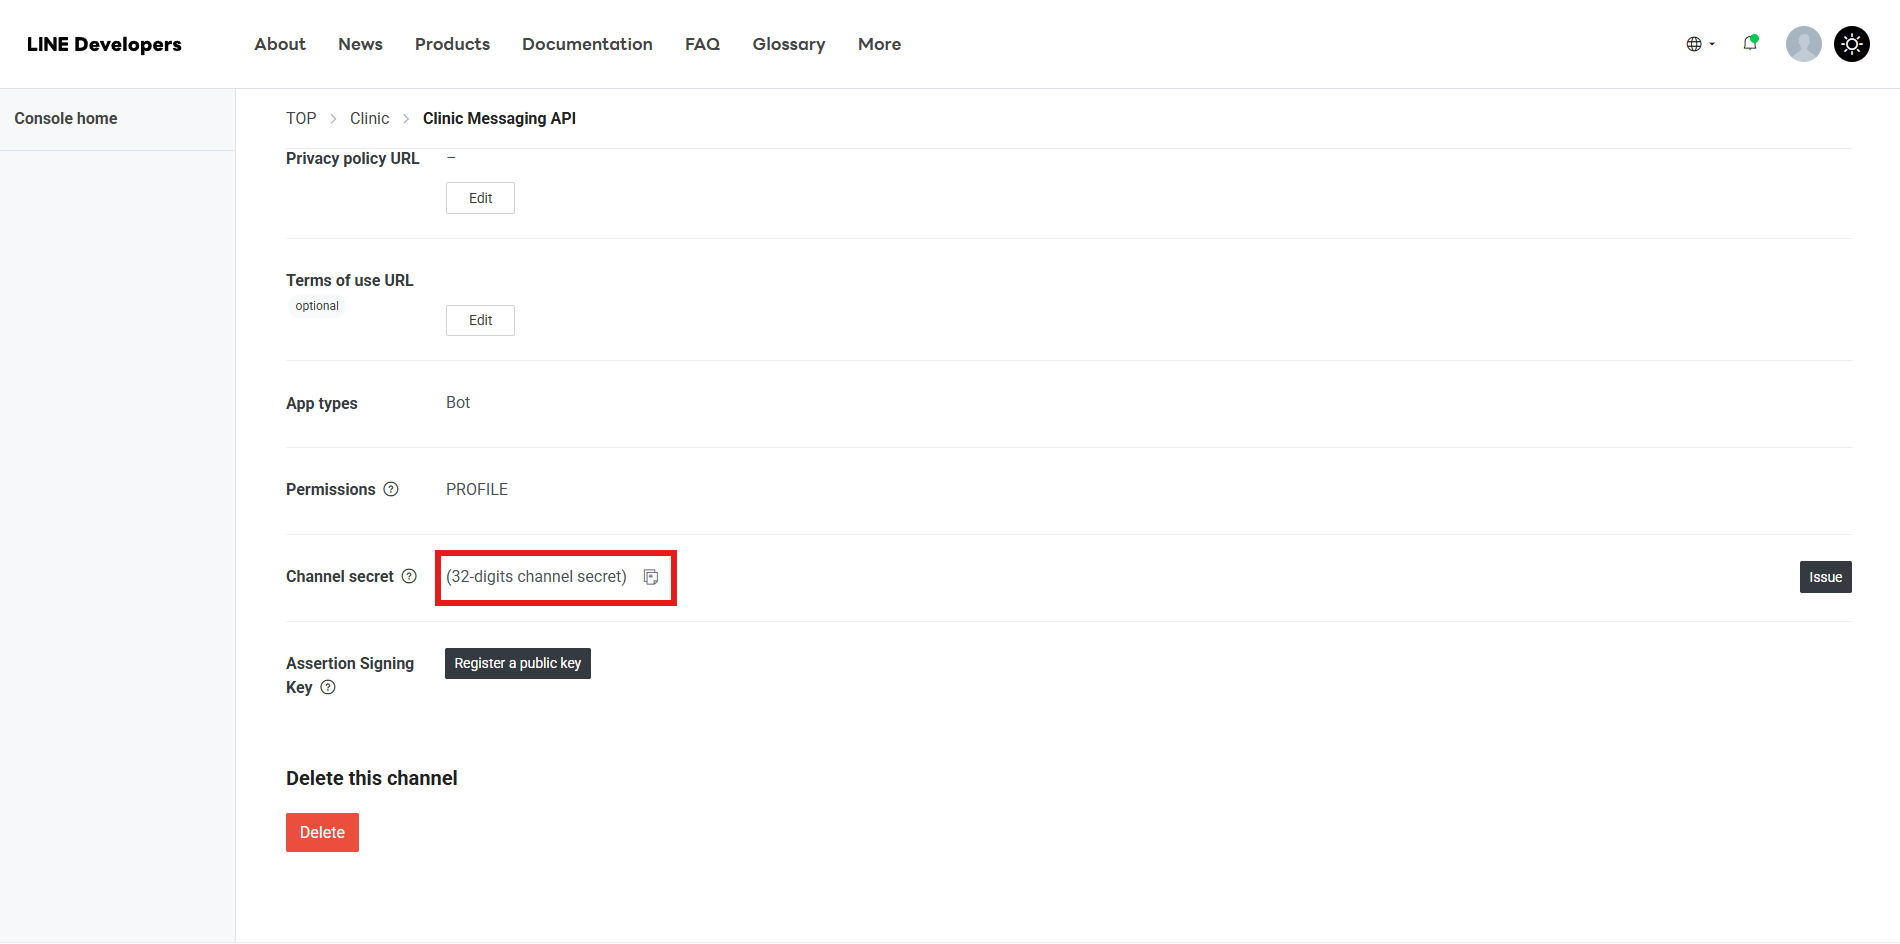
Channel Secret
- Same Channel → Basic settings tab
- In the Channel secret field in the middle — copy the 32 characters
Connect the LINE channel in the CRM
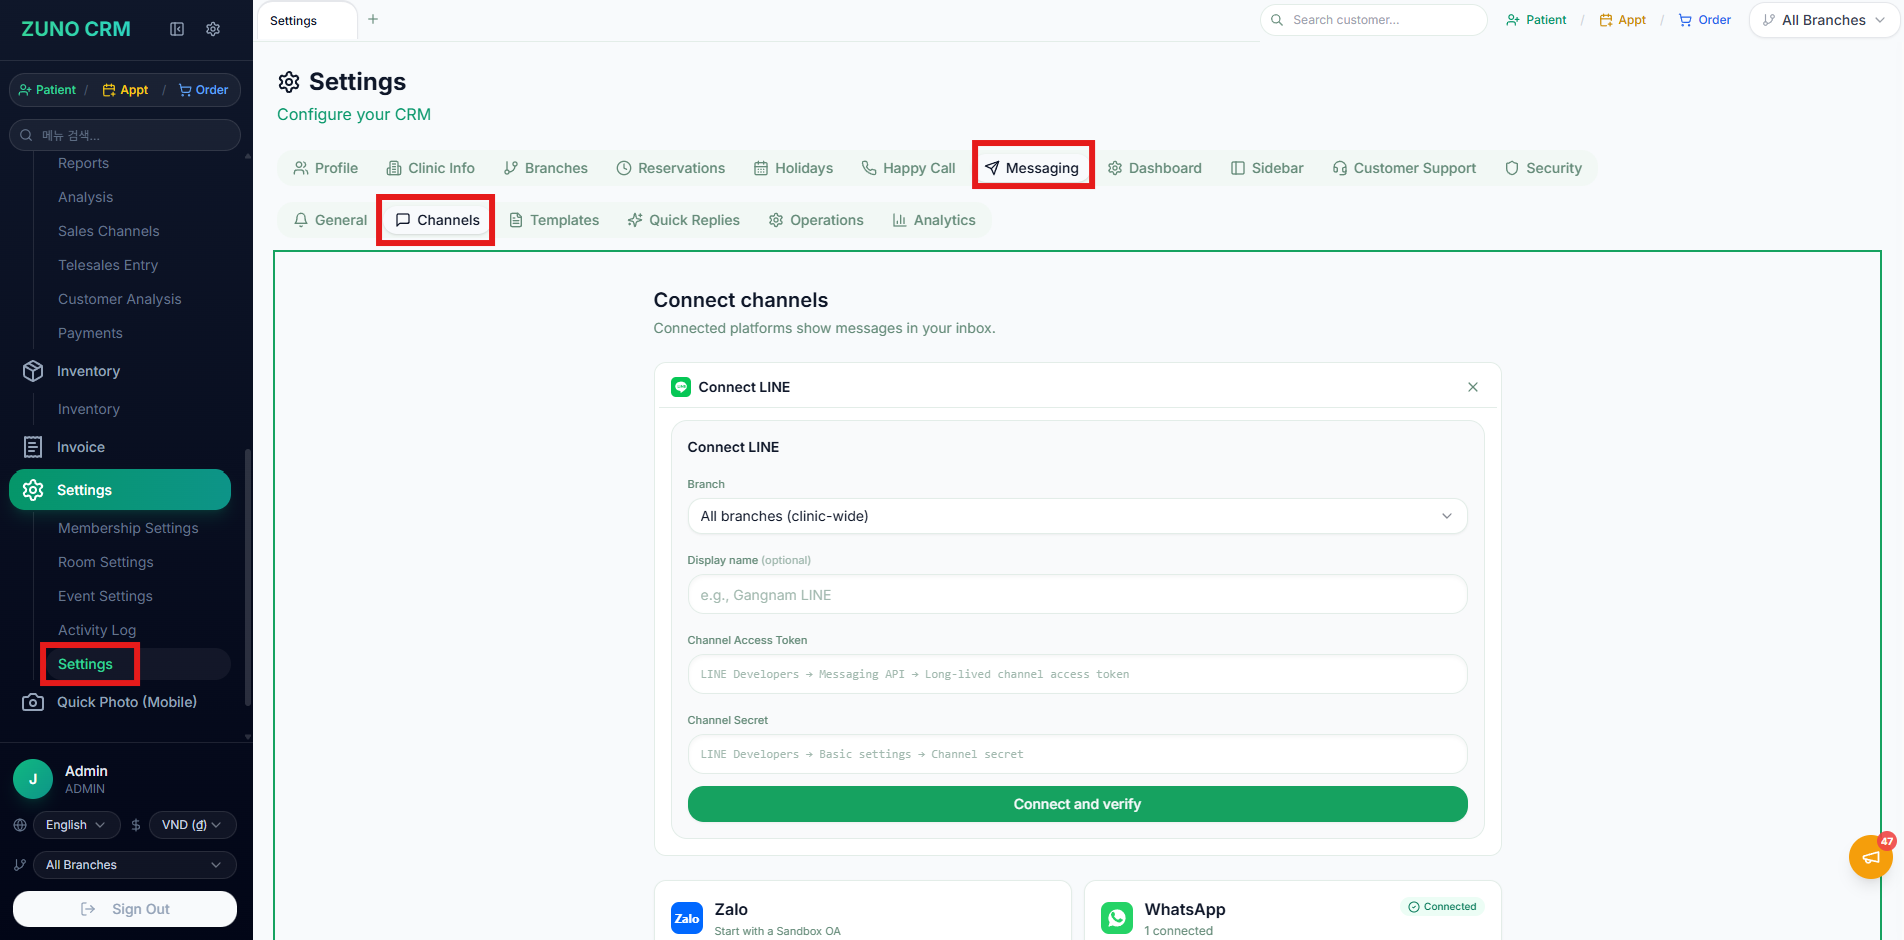
Time: 3 minutes- Log in to the CRM → Settings → Channels → the “Connect channel” page
- Click the “Connect channel” button on the LINE card → select a Branch → the connection form opens
- Fill in the form:
- Channel Access Token: the long-lived token copied in Step 2
- Channel Secret: the 32 characters copied in Step 2
- The display name is optional (e.g. Our Clinic LINE)
- Click “Connect and verify” → it succeeds when “Connected” is shown
Register the Webhook URL (LINE Developers)
Time: 5 minutesOnce the connection is complete, the CRM shows this channel’s dedicated Webhook URL along with a “Next steps:” note. You must register this value on the LINE side so that patient messages flow into the CRM.
- Copy the Webhook URL shown under “Next steps:” on the connection-complete screen using the copy button
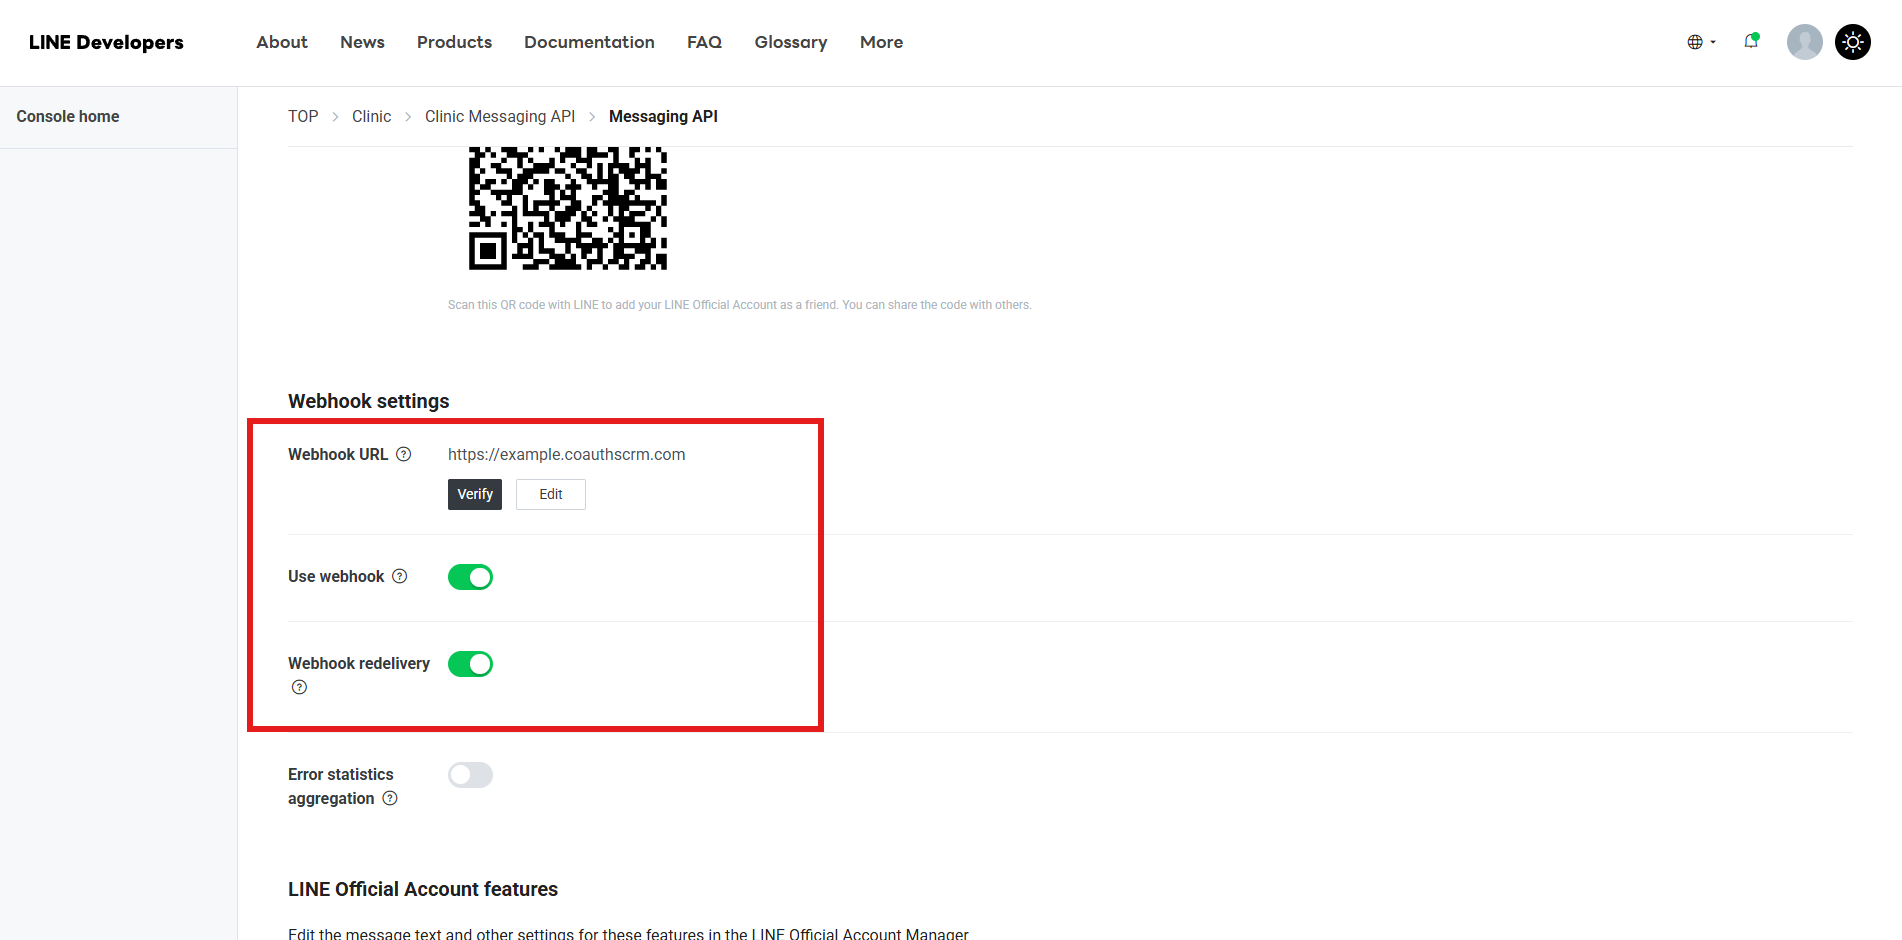
- developers.line.biz/console → the relevant Channel → Messaging API tab → Webhook settings
- Paste it into the Webhook URL → Update
- Verify → confirm “Success”
- Enable Use webhook (ON) + disable the OA’s Auto-reply messages (auto-response)
- Webhook redelivery: ON recommended (resends on a temporary outage)
Send a test message and check the inbox
Time: 2 minutes- Add the OA as a friend from your own LINE app (the QR code is in the Developers Console or OA Manager)
- Send a test message to the OA
- Confirm it arrives in the CRM inbox within a few seconds
- Reply from the CRM, and once it reaches your own LINE ✅ two-way connection is complete
Common issues
"Connect and verify" shows an error
The most common cause is stray whitespace or a line break copied along with the Channel Access Token or Channel Secret. The token must be the long-lived token from the Messaging API tab. If you reissued the token in LINE, the old one is invalidated immediately — try again with the new token. If it still fails, contact your Coauths representative.
Webhook Verify failed
The #1 cause is the OA Response settings (Chat OFF / Webhook ON / Auto-response OFF). Re-check the Response settings guide. The #2 cause is a Webhook URL typo — paste the URL exactly as copied from the "Next steps:" section on the CRM connection-complete screen (must start with https).
Patient messages do not appear in CRM inbox
Re-check that all three Response settings are correct: Chat OFF / Webhook ON / Auto-response OFF. Also verify that Use webhook is ON in LINE Developers and that the Webhook URL matches the value copied from the CRM connection-complete screen. Finally, check the OA is not Unpublished (Settings → Account info).
Sending fails and the channel card shows "Reconnect"
Reissuing the Access Token in LINE immediately invalidates the old one. Issue a new long-lived token in LINE Developers, then enter it via the "Reconnect" button on the channel card.
Exceeded 200 free messages per month
OA Manager → Settings → Subscription. Upgrade to Light (₩5,000/month, 5,000 messages) or Standard (₩15,000/month, 30,000 messages). Free quotas and plans vary by country (the above is the Japan baseline — check the OA Manager pricing for your country).
Conversations from before connecting are missing from the inbox
This is expected. LINE has no API for past chat history, so the CRM inbox only accumulates messages received after the moment of connection. Older conversations remain visible only in the LINE Official Account app.
Replies sent directly from the LINE Official Account app do not show in the CRM
LINE does not deliver manually sent OA-side messages to the webhook, so replies sent from OA Manager or the Official Account app will not appear in the CRM inbox. To keep the full consultation history in one place, reply from the CRM inbox.
📄 Download the full guide PDF
For offline reference — a print-friendly PDF version of this page.